Teachers are sometimes the first people to notice screen addictions in our kids, and we often get questions from schools about what Screen-Free Week looks like in a classroom setting. Luckily, it can be celebrated in so many different ways! Here, Indiana teacher Justin Croy discusses how his own class goes screen-free every year.
I spent days thinking of ways I could help teachers prepare for Screen-Free Week, compiling reasons why they should celebrate in their classrooms – until I realized that if you’re reading this blog, there is a good chance that you already know why it’s important. Instead, I decided to share how my middle schoolers celebrate Screen-Free Week in my Digital Citizenship class, as well as provide some hands-on activities that anyone can implement –in and outside the classroom.
At the beginning of each school year every student wants to know, “What is Digital Citizenship?” My response is usually short: “it’s how to act online.” At first, even with the obvious relevance of this theme, I struggled for a while to figure out how Screen-Free Week would fit in my curriculum. When I first approached my administrators about celebrating, the idea was met with awkward looks, followed by the daunting question, “How does spending 5 to 7 class days without technology relate to, well, technology?”
After tossing the idea around for a while, I found the perfect fit for Screen-Free Week in my Digital Citizenship curriculum: one of the nine elements of Digital Citizenship is “Digital Balance.” Digital Balance is the way students balance their time on screen with physical and mental activities that do not involve screens. Although only spending 1 out of 36 weeks without screens doesn’t necessarily seem balanced, it is a step in the right direction. Screen-Free Week provides the perfect opportunity to teach students about the importance of setting their technology aside and finding other ways to engage their mind and body. It’s a real “stop and smell the roses” approach to technology.
Implementing Screen-Free Week is a process, and it requires some planning ahead. I spend weeks mentally preparing for the week, mulling over what we will do and how we will do it. What will modern students find fun? What if it rains? What if we have to go back to virtual or synchronous learning? Mentally preparing seems to be half the battle.
However, the most important part of planning is to create or discover 3 to 4 activities for your students to do in the classroom during the week. I usually opt for STEM activities, but a simple online search can help find activities that you can do in your classroom. Below is a sample itinerary for the week that has worked well for my students:
TIPS – I instruct all students to leave technology in their locker during my class for the week. I will give them extra time to get to class and I will send them back to their locker if they bring it with them. It’s a simple trick to refocus attention away from handheld devices.
MONDAY – Resource Day
-
- Explain what Screen-Free Week is to students and why it is important.
- Have students fill out a Screen-Free Week pledge card.
- Pass out the Write Your Screen-Free Plan handout. (I instruct students to think about what they can do to go screen-free. I suggest they complete this by finding other activities rather than being on their device. Examples include “Not be on my device on the bus”).
- Finally, distribute the I Go Screen-Free Because handout. I have students use colored pencils to draw a photo and write why they go screen-free. I instruct them to take their time. I then take the handouts and hang them outside the classroom door.
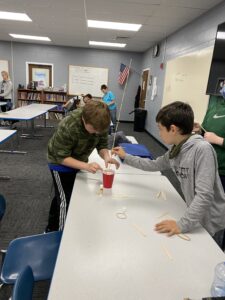
TUESDAY – POPSICLE STICK TOWERS (STEM Activity)
(See Lesson Plan Below)
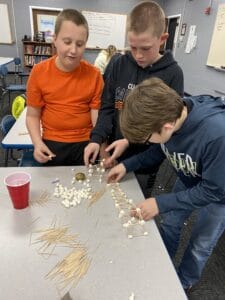
WEDNESDAY – Toothpick Bridge Challenge (STEM Activity)
(See Lesson Plan Below)
THURSDAY – Student Day
On Thursday, I allow students to come up with their own ideas for what to do. I inform them that if the weather is nice, we will go outside and enjoy the outdoors together. When outside, some students play tag, while others clean up the trash around the school or take laps around the track. If the weather is not cooperating on that day, we remain inside and students have the opportunity to either play a class game or do individual group activities, such as board or card games. There are only two rules: no doing homework (students must be communicating with each other) and, of course, no sleeping.
FRIDAY – Review Screen-Free Week
On Friday, we review what we did, how it helped them, and what they learned by going screen-free for that week. I allow each student to share what they experienced; as a conversation starter, I ask the students these questions:
-
- What did you learn by celebrating Screen-Free Week?
- What did you like most about Screen-Free Week?
- Did you celebrate Screen-Free Week at home?
—————————————————————————————————————————————-
POPSICLE STICK TOWER STEM ACTIVITY
Students will use popsicle sticks and glue to build a tall structure
Time: (45 Min)
Explaining/passing out materials (10 Min)
Students building towers (25 Min)
Measure bridges (5 Min)
Clean up (5 Min)
USING GLUE STICKS
What you will need:
1 – red solo cup for base
100 – popsicle sticks per group
1 – large rubber band
1 – yardstick for measuring
Instructor prep:
- Flip the cup upside down and put the rubber band around the cup.
- Take 4 popsicle sticks and insert them equidistant around the cup. This will act as a base.
- Give the group the rest of the popsicle sticks and have them begin. They have 25 minutes to build the highest tower they can.
- Take a yard stick and measure the height of each tower.
- The group with the highest tower wins!
USING HOT GLUE GUNS
What you will need
100 – popsicle sticks per group
2 – hot glue guns per group
4 – hot glue sticks
1 – yardstick for measuring
Instructor Prep
- Divide students into groups of 3 or 4.
- Give the students the glue guns and 100 popsicle sticks and have them begin. They have 25 minutes to build the highest tower they can.
- Take a yard stick and measure the height of each tower.
- The group with the highest tower wins!
—————————————————————————————————————————————-
TOOTHPICK BRIDGE CHALLENGE – STEM ACTIVITY
Students will use toothpicks and marshmallows to build the strongest bridge they can.
Time: (50 Min)
Explaining/passing out materials (10 Min)
Students building bridges (25 Min)
Testing bridges (10 Min)
Clean up (5 Min)
What you will need:
1 – bag of small (mini) marshmallows (will cover 2-3 groups)
100 – toothpicks
1 – ruler per group
Instructions:
Divide students into groups of 3 or 4.
Give each group 100 toothpicks and a cup of small marshmallows.
Tell students that bridges must be at least 12 inches long. Use a ruler to measure.
Students have 25 minutes to build a bridge. Inform the students that their bridge will have to hold when suspended between two desks.
Move two school desks (or other structures of equal height) 8 inches apart. Have students move their bridge and lay each end equally between the two desks. If the bridge holds, add a pencil on top of the bridge. The bridge that can hold the most weight for the longest amount of time wins.
Instructor Prep
- Flip a ½ – full cup of mini marshmallows and give them to each class.
- Give each group 1 box of 100 toothpicks.
- Give them 1 ruler to measure the length of their bridge.
- Winner is determined by how long the bridge stays suspended across the desks, if time becomes an issue add some type of weight (coins or pencils, etc.) across the bridge.

Mr. Justin Croy is Business & Technology Educator at Culver Community Middle/High School in Indiana. Since becoming a teacher in 2018, Mr. Croy has taught Interactive Media, Business, Communications, Radio & TV, Entrepreneurship and Broadcasting, and Digital Citizenship. He also coaches football & basketball at CCMHS. Mr. Croy is a lifelong resident of Culver, living there with his wife Hanna and daughter Elleighana.

